I found another glitter crelly master! Polish By Jessica Jean! I saw she was releasing a few new ones a week or so ago and fell in love with one. Me being me, I couldn't just get one... Check out the swatches of the two pretties I got after the jump.

May 31, 2015
May 22, 2015
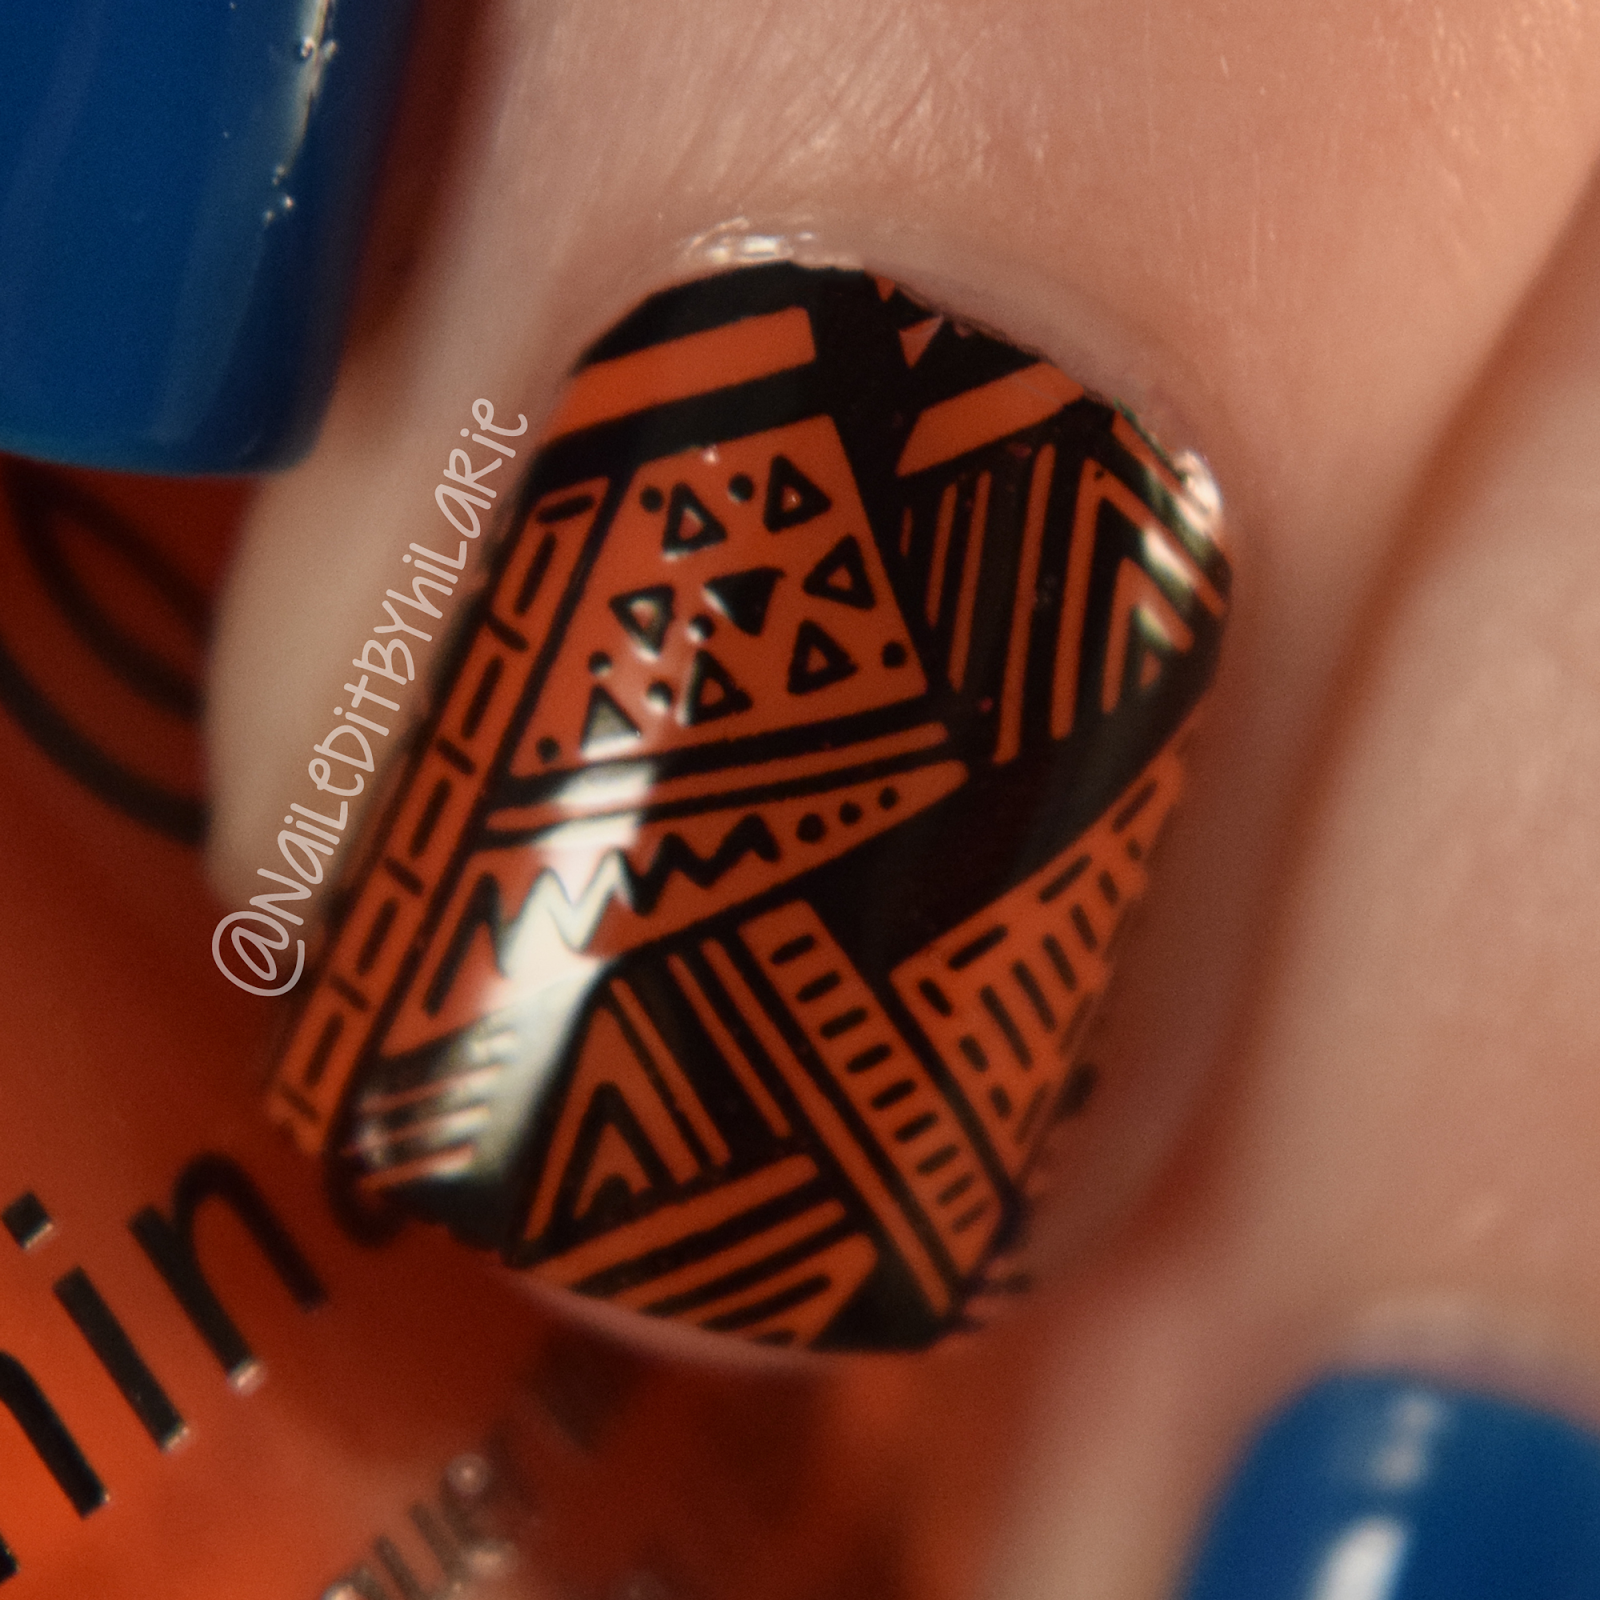
Tribal Stamped Accent Nail

Polishes:
Julep - Oxygen Smoothing Base Coat
China Glaze - License & Registration Please
China Glaze - Pop The Trunk
Rica Polish - Black Out
Julep - Oxygen Top Coat
Stamper
Bundle Monster Plate BM603
May 21, 2015
Striped Water Marble - Pipe Dream Polish


Honestly, I probably should have made a video for this, but I'll try to explain as best as I can...
I use the entire Pipe Dream Polish "A Night In Vegas" creme collection. I started with a white base on my nails and put liquid latex all around my cuticles and finger tips. When I marble, I use a medium sized plastic cup filled about one inch from the top with about room temperature tap water. I also have a long sewing pin and cosmetic sponge nearby for when I start marbling as well as a popsicle stick or orange wood stick. Line up your polishes close to your cup and have them all unscrewed; you'll need to work quickly!
Drop one drop of each color onto the surface of the water, pink, orange, yellow, green, teal, blue, purple, then repeat. Using the sewing pin, drag from the center of the bulls eye to the top, all the way to the edge of the cup, then from the center to the bottom. Wipe your pin on the cosmetic sponge after each line to keep it clean. Starting a couple rings in at the top left of the bulls eye, drag the pin horizontally across the cup. Move down about a quarter or a half inch and drag the pin from right to left horizontally. Repeat until you've reached the bottom. Rotate your cup 90 degrees, the stripes should be vertical now. Drag your pin left and right horizontally down the bulls eye again. Find a section of stripes you like the best and dip your first nail. While still submerged, blow on the polish on the surface. Use the popsicle or orange wood stick to collect the polish on the water. Oncea ll the polish has been removed, pull your finger out of the water. Remove the latex with tweezers, use acetone to clean up around your cuticle and apply top coat.
Polishes:
Salon Perfect - Sugar Cube
Pipe Dream Polish - On The List
Pipe Dream Polish - 110 Degrees
Pipe Dream Polish - Light Of Day
Pipe Dream Polish - High Roller
Pipe Dream Polish - Happy Hour
Pipe Dream Polish - All In
Pipe Dream Polish - VIP Pass
Salon Perfect - Top Coat
May 20, 2015
Memorial Day Nail Art

*Note: I realize my stars are upside down here, but when I was looking at my nails while stamping, they were right side up. It all depends on which way ya look at them. ;)
I started with a base of Essie "Hide & Go Chic" on my index and middle nails and Salon perfect "Sugar Cube" on my ring and pinky and applied Dream Polish "Gem Glam Top Coat". I gave the top coat about 5-10 minutes to dry completely before adding the finishing touches. I used "Whiteout" from Rica's Polish to stamp the stars and Straight Vinyls from Nail Vinyls with China Glaze "Bing Cherry" for the stripes. I let the details dry completely for about 10 minutes to prevent any smudging before finishing with Salon Perfect Top Coat.
Polishes:
Essie - Hide & Go Chic
Salon Perfect - Sugar Cube
Rica - White Out
China Glaze - Bing Cherry
Dream Polish - Gem Glam Top Coat (Jelly Bean Scented)
Salon Perfect - Top Coat
Tools:
Stamping plate
Stamper from this set
But the larger scraper from this set
Straight nail vinyls
NWP Monthly Box - Avengers
Native War Paints recently introduced a new monthly subscription box. The box is $17.50 a month. It comes with a full sized and mini polish based on a certain theme along with another item that could be another polish, hand and nail care products, or a make up item. This box came with an extra polish, which I was super excited about. The first box was for May and was Avengers themed, so I had to get one! See what was inside after the break!
May 19, 2015
Regal Ween Lacquer Swatches
Personally, I hate buying just one polish online. No, not because I'm an addict, but because of shipping costs. And I know you know what I'm talking about. So when Regal Ween Lacquer announced they were adding mani fizzies to their shop, I couldn't resist! I had been eyeing a certain polish for a while so I picked that one up as well as some fizzies. Swatches and review after the break...
Candied Apple Polish Swatches
I recently purchased a few new polishes from Candied Apple Polish, a glitter topper turned crelly and my very first Mystery Apples! Check out the swatches of these beauties after the break...
May 18, 2015
Harry Potter Nail Vinyls

I started with my base coat, one coat of Salon Perfect "Gold Leaf", then applied my Salon Perfect Top Coat. The top coat here is not necessary, but once completely dry, it prevents the other layers of polish from lifting in case the vinyls need repositioning. Using tweezers, I applied Lou It Yourself's Harry Potter vinyls onto my nails. On my ring finger, I positioned the lightning bolt, but didn't press it into place as much as the others and left a tiny bit of the vinyl lifted. I painted Salon Perfect "Oil Slick" over it, then peeled off the vinyl leaving the gold lightning bolt. To finish it all off, I topped it with one coat of Salon Perfect Top Coat on my accent nail, and two coats over the others to smooth out the vinyls.
Polishes:
Salon Perfect - Gold Leaf
Salon Perfect - Oil Slick
Salon Perfect - Top Coat
To see the other manis from this collab, check out #HarryPotterAndThePaintedNails on Instagram.
May The Fourth Be With You - Dark Side Duo
For May The Fourth, Native War Paints and Lou It Yourself put together two Star Wars inspired duos, The Dark Side and The Light Side. Each duo came with some awesome Star Wars nail vinyls and a mani bomb ("Plink"). I picked up the dark side duo. Swatches are after the break...
Star Wars Nail Art

All art was painted using acrylic craft paint and my Winstonia Glam Gadgets brush set.
Polishes:
Salon Perfect - Sugar Cube
Salon Perfect - Oil Slick
Zoya - Imogen
Salon Perfect - Top Coat
May 17, 2015
Stamped Mermaid Nail Art

After multiple failed attempts at stamping, I think I've finally done it! I'm only on my fourth stamper, second brand of stamping polish, and last bit of patience, but I did it right? I can't wait to master stamping so I can share all the helpful hints the nail community has shared with me to help me with this.
I started with a white base, then gradiented over it with my blues and greens. Once it was opaque enough, I applied a holo top coat and then a quick dry top coat. I waited about 10 to 15 minutes before stamping to make sure all my polish was completely dry. I stamped my mermaid scale pattern on each nail, applied top coat again and added rhinestones, pearls, and a seashell charm to complete the look.
Polishes:
Salon Perfect - Sugar Cube
China Glaze - Shore Enuff
China Glaze - My Way Or The Highway
China Glaze - License & Registration Please
Bliss Polish - Holo Bliss Top Coat
Just Ricarda - Blackout
Salon Perfect - Top Coat
Subscribe to:
Posts (Atom)